Creating a DIY outdoor play area provides a fun and safe environment for children to enjoy. It can be simple to assemble with the right materials and tools.
Transforming your backyard into an engaging space for kids to play and learn doesn’t have to be expensive or time-consuming. By choosing the right spot, incorporating natural elements, and using creative play structures, you can create an inviting and stimulating outdoor play area.
Safety should be the top priority, ensuring that all equipment and materials are child-friendly and well-maintained. With a bit of planning and some DIY spirit, parents and guardians can construct an outdoor haven that encourages active play and nurtures imagination. Remember to regularly check for wear and tear and to adjust the play area as the children grow to keep it challenging and interesting.
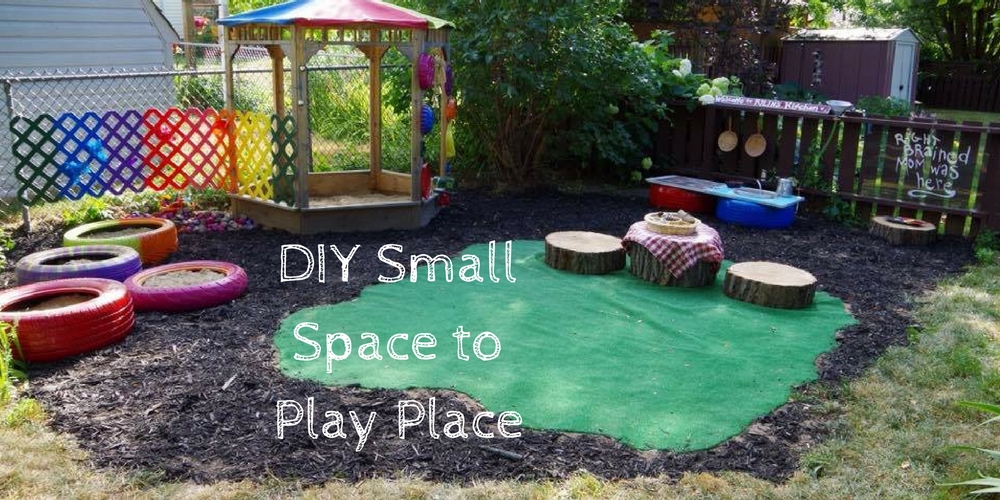
Credit: blog.parentlifenetwork.com
Introduction To Diy Outdoor Play Areas
Turning your backyard into a play paradise is a fun project. A DIY outdoor play area sparks kids’ imaginations. It gets them moving and learning too. Let’s explore the magic of creating a play space right outside your door.
Benefits Of Outdoor Play
Outdoor play is vital for kids. It helps them grow strong and healthy. Here’s why it’s great:
- Boosts physical health: Running and jumping improve fitness.
- Encourages creativity: Nature inspires new games and adventures.
- Teaches social skills: Kids learn to share and play together.
- Connects with nature: Children discover plants and animals.
Why Choose Diy?
Building your play area is rewarding. You make it fit your space and needs. You can craft it with love, knowing every corner is safe and fun.
- Customize to your child’s likes.
- Use materials you trust.
- Change the area as kids grow.
- Save money by doing it yourself.
Ready to start? Grab your tools and let the adventure begin!
Initial Planning And Design
Welcome to the exciting journey of creating a DIY outdoor play area for your children! The right planning and design can transform your backyard into a wonderland of adventure and creativity. Before you pick up a shovel or paintbrush, let’s dive into the essential first steps to ensure your project is a success from the ground up.
Assessing Your Space
Understanding the layout of your outdoor space is crucial. Start with measuring the area you want to convert into a play zone. Consider these factors:
- Safety: Ensure the area is far from roads and water bodies.
- Shade: Identify spots with natural shade for sunny days.
- Size: Match the play area size to the number of kids using it.
Creating a diagram helps visualize the space. Use graph paper or a digital design tool for accuracy. This will serve as a guide for your project.
Choosing A Theme
Selecting a theme adds excitement and personalizes the play area. Here are popular themes:
| Theme | Features |
|---|---|
| Pirate Adventure | Ship structure, treasure chest, and flags. |
| Fairy Garden | Flowers, fairy houses, and twinkling lights. |
| Jungle Safari | Greenery, animal figures, and binoculars. |
Involve your kids in choosing a theme. Consider their interests and what they love to play. This will ensure the play area is a hit!
Essential Tools And Materials
Creating an outdoor play area for your kids is a fun project. It sparks imagination and encourages outdoor activity. But before you start, you need the right tools and materials. Getting these ready makes the process smoother and safer.
Basic Tools Needed
To build a play area, start with a good set of tools. Here’s what you’ll need:
- Measuring Tape: For accurate dimensions.
- Saw: To cut wood to size.
- Drill: For assembling parts together.
- Screwdriver: To secure screws.
- Hammer: For nails and stakes.
- Level: To ensure structures are even.
- Sandpaper: To smooth out edges.
- Shovel: For groundwork preparation.
- Safety Gear: Gloves, goggles, and masks.
Selecting Safe And Durable Materials
Choosing the right materials is crucial for safety and durability. Consider these:
| Material | Use | Benefits |
|---|---|---|
| Pressure-Treated Wood | Framework and supports | Resists rot and insects |
| HDPE Plastic | Slides and panels | Weather-resistant, no splinters |
| Rubber Mulch | Ground cover | Soft, cushions falls |
| Stainless Steel | Hardware | Rust-proof, strong |
Remember, non-toxic and UV-protected materials keep kids safe from harm.
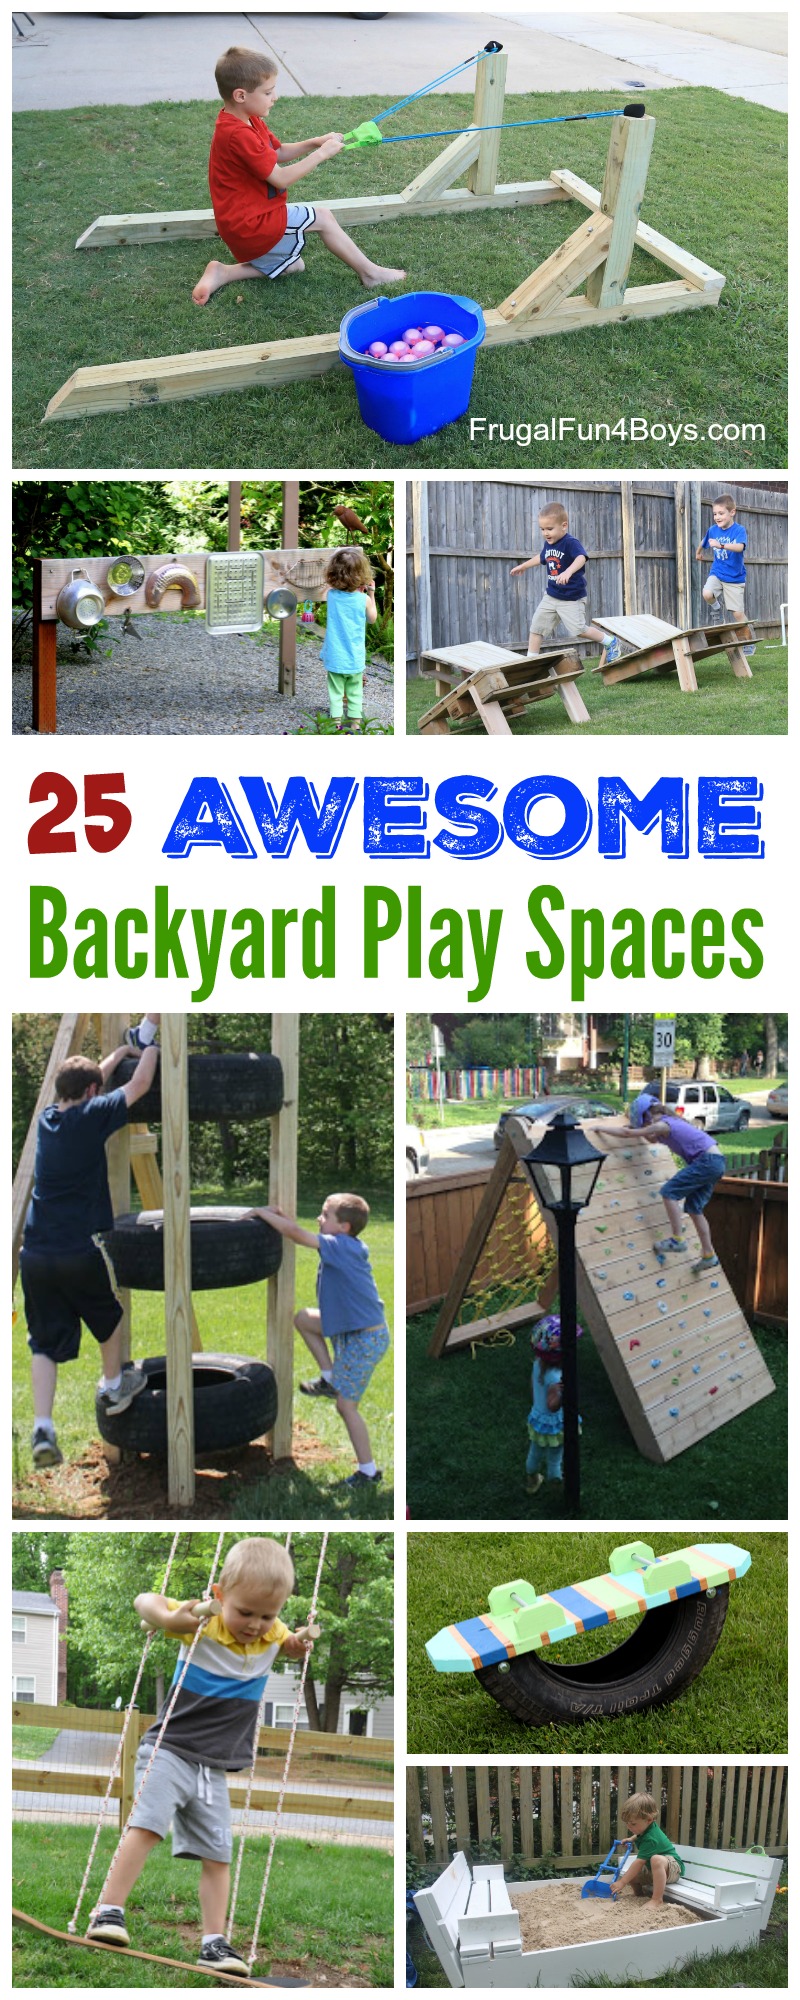
Credit: frugalfun4boys.com
Step-by-step Guide To Building A Sandbox
Ready to create a magical play space for your kids? Building a sandbox is a fun DIY project that can provide hours of entertainment. Follow this step-by-step guide to construct a safe and delightful sandbox in your own backyard.
Frame Construction
Choosing the right materials is the first step. Cedar or redwood resists rot and insects. Cut the wood to the desired length for a square or rectangular sandbox. Next, lay out the pieces where you want the sandbox to be.
Assemble the frame by connecting the corners with galvanized screws or corner brackets. Ensure the frame is level with a carpenter’s level. Once the frame is assembled, line the bottom with landscape fabric to prevent weeds and allow drainage.
Sand Selection And Maintenance
Choosing the right sand ensures your sandbox is a clean, safe place to play. Play sand is the best choice as it’s washed and sifted to remove impurities. Avoid building or concrete sand as it may contain harmful materials.
Fill your sandbox with the play sand until it’s several inches deep, allowing for plenty of digging and building. To maintain the sandbox, cover it when not in use to keep animals and leaves out. Periodically rake the sand to keep it fresh, and replace it annually to maintain a healthy play environment.
Constructing A Simple Treehouse
Embarking on the adventure of constructing a simple treehouse transforms your backyard into a hub of imagination and play. This DIY project not only provides a unique retreat for children but also ignites their creativity and love for nature. Let’s delve into the key steps to create this enchanting hideaway.
Design Considerations
Before hammer meets nail, thoughtful planning ensures a successful build. Begin by choosing a sturdy tree with healthy branches. A good design balances fun features with practicality. Keep the structure modest to maintain ease of construction and minimize materials needed. Opt for natural, durable wood that blends with the surrounding environment. Plan for adequate headroom, cozy seating, and a simple ladder or steps for access.
- Tree selection: Strong, mature tree
- Size: Manageable, kid-friendly dimensions
- Materials: Weather-resistant wood and hardware
Safety Features To Include
Safety takes precedence in any play area. Equip the treehouse with secure railings to prevent falls. Ensure all joints and supports are robust and regularly inspected for wear. Smooth all surfaces to eliminate splinters. Install grips or handles to aid climbing. Choose non-toxic materials and finishes for peace of mind.
| Feature | Details |
|---|---|
| Railings | High, sturdy barriers |
| Structural Integrity | Reinforced joints and supports |
| Surface Treatment | Smoothed wood, child-safe finishes |
| Climbing Aids | Handles and grips for safe ascent |
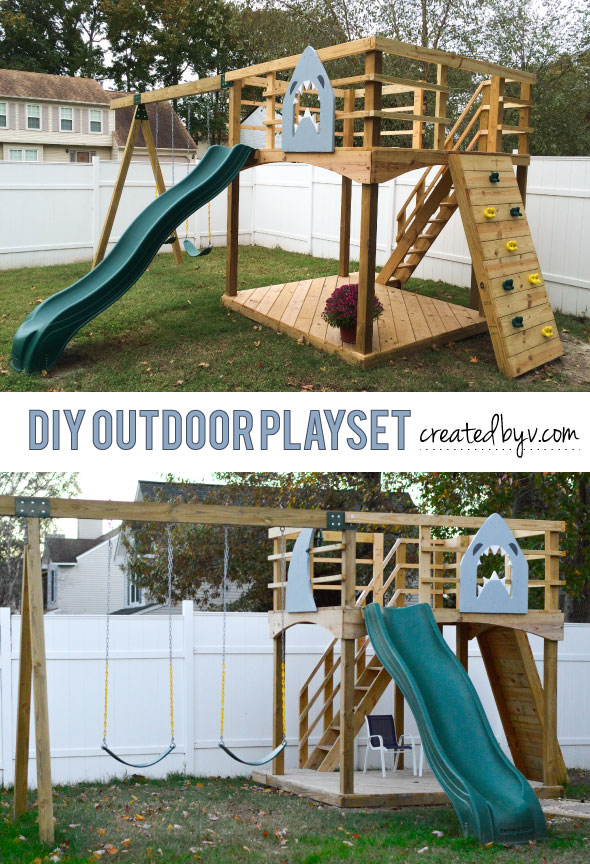
Credit: createdbyv.com
Creating A Water Play Area
Summer is coming, and what better way to beat the heat than with a DIY outdoor water play area? Splashing around in the water is not just fun but also a great way for kids to stay cool and active. Let’s dive into creating a safe and entertaining water play space right in your backyard!
Designing For Water Safety
Ensuring safety is the top priority when it comes to water play. Here are some tips for creating a secure environment:
- Choose a flat area to avoid slips and falls.
- Install slip-resistant surfaces around the play area.
- Keep the water shallow to prevent drowning risks.
- Set clear rules for kids to follow while playing.
- Always have adult supervision during playtime.
Diy Water Features
Create exciting water features without breaking the bank. Use these creative ideas:
| Feature | Materials Needed | Steps |
|---|---|---|
| Splash Pad | Tarp, Sprinklers, Hose | 1. Lay the tarp flat. 2. Attach sprinklers. 3. Connect the hose. |
| Water Table | Plastic Bins, Water Toys | 1. Fill bins with water. 2. Add toys. |
| Mini Waterfall | Buckets, Tubing, Pump | 1. Stack buckets. 2. Install pump. 3. Add water. |
With these simple yet fun features, your outdoor water play area will be the coolest spot on the block!
Obstacle Course Elements For Kids
Creating a DIY outdoor play area with an obstacle course can be a fun project. It is a great way for kids to stay active and enjoy the outdoors. Let’s explore some exciting obstacle course elements that are perfect for children.
Planning Your Course
Start by evaluating the space available in your backyard. A good plan ensures that the course is safe and fun. Consider the age and abilities of the children who will use it. Use natural landscape features to your advantage. Trees can become part of climbing obstacles or bases for hanging items.
- Measure the area to fit all elements comfortably.
- Choose a theme to make it more exciting, like pirates or jungle adventure.
- Sketch a rough layout to include various obstacles.
- Ensure all paths and surfaces are safe for running and playing.
Easy To Build Obstacles
With basic tools and materials, you can create engaging obstacles. These elements do not require expert skills to construct.
| Obstacle Type | Materials Needed | Build Time |
|---|---|---|
| Tire Hop | Old tires, sand for stability | 30 minutes |
| Balancing Beam | Long wood plank, bricks or sturdy logs | 20 minutes |
| Crawl Tunnel | Large cardboard tubes, duct tape | 45 minutes |
Here are more simple obstacles you can include:
- Rope Swing: Hang a rope from a strong tree branch. Make sure it’s secure.
- Slalom Run: Use cones or homemade markers for zigzag running.
- Mini Hurdles: Set up small, safe barriers to jump over.
These obstacles are not only fun but also boost physical skills and confidence. Always check and maintain the equipment for safety. Enjoy building and watching your kids have a blast in their new play area!
Eco-friendly Play Area Ideas
Creating an eco-friendly play area can be fun and sustainable. Here are some ideas to help you start your green project.
Using Recycled Materials
Recycled materials are perfect for crafting a unique play area. By reusing items, you help the planet and save money. Below are some creative ways to use recycled materials:
- Old tires can become swings or sandbox borders.
- Plastic bottles can be transformed into fun sprinklers.
- Wooden pallets can make sturdy play structures or benches.
Always ensure all materials are safe and sanded down to prevent splinters or cuts.
Incorporating Natural Elements
Using natural elements not only looks beautiful but also encourages wildlife to visit. Here are some ideas:
- Plant a butterfly garden nearby to attract beautiful insects.
- Use sand and stones for a natural-looking landscape.
- Build a mud kitchen using old wood and metal bowls.
Natural elements provide perfect tools for sensory play, helping children learn and explore.
Remember, creating an eco-friendly play area provides a great opportunity for kids to learn about sustainability and nature while having fun.
Maintenance And Safety Checks
Creating a DIY outdoor play area is just the beginning. Keeping it in tip-top shape is crucial for the safety and enjoyment of its little users. Regular maintenance and safety checks are vital. They ensure the play area remains a fun and secure environment for children. Let’s dive into some essential tips and routines to help you keep your play area safe and sound throughout the year.
Regular Inspection Tips
Inspecting your play area should be a routine task. Here’s a checklist to follow:
- Check all equipment for any signs of wear or damage.
- Look for sharp edges or protruding hardware that could cause injuries.
- Ensure that all fastenings are tight and secure.
- Examine the ground cover for any hazards or displacement.
- Test stability of swings, slides, and other structures.
Keep a log of your inspections for future reference. This helps in tracking any changes or patterns that might need attention.
Keeping Your Play Area Safe
Safety is non-negotiable. Here are steps to ensure ongoing safety:
- Regularly refresh the ground cover to maintain appropriate cushioning.
- Install guards or caps on all sharp corners and open ends.
- Supervise play to monitor equipment use and prevent risky behavior.
- Establish clear safety rules for children to follow while playing.
- Consider a periodic professional inspection for expert advice.
Remember, immediate action is required if you spot any hazards. Repair or replace faulty equipment as soon as possible to prevent accidents.
Engaging Kids In The Building Process
Creating a DIY outdoor play area is not just about the end result, it’s a journey filled with learning and bonding opportunities. Involving children in the building process is incredibly rewarding. It teaches them valuable skills, keeps them active, and provides a great sense of accomplishment. Let’s explore how to make this an educational and fun experience for them.
Educational Opportunities
Building a play area is an excellent way to introduce children to new concepts. It covers various educational areas:
- Mathematics: Measuring materials and space.
- Science: Understanding the durability of different materials.
- Art: Designing and decorating the play area.
- Teamwork: Learning to work together and share ideas.
Tasks Suitable For Children
Children can be involved in many tasks during the building process. Here’s a list of child-friendly tasks to get them started:
| Age Group | Tasks |
|---|---|
| 3-5 years |
|
| 6-8 years |
|
| 9+ years |
|
Remember to supervise all activities, ensuring safety at all times. Equip them with child-friendly tools and safety gear. Praise their efforts to boost their confidence and keep them motivated. By including children in the DIY project, you’re not only building a play area but also building memories that will last a lifetime.
Frequently Asked Questions
How To Make A Kids Play Area Outside?
Select a safe, level area in your yard. Incorporate soft ground cover like rubber mulch. Add age-appropriate play structures, like swings or a sandbox. Ensure the space is enclosed with a fence for safety. Regularly inspect and maintain equipment for durability.
How Do I Build My Own Playground?
To build your own playground, choose a safe location, design a layout, select durable equipment, prepare the site, and install the structures following the manufacturer’s guidelines. Ensure all materials are child-friendly and regularly inspect for safety.
How Do You Make A Natural Playscape?
To create a natural playscape, integrate native plants, use natural terrain features, incorporate elements like sand and water for play, add logs and boulders for climbing, and ensure the area is safe and accessible for children.
How To Set Up An Outdoor Play Area?
Choose a safe, level area for your outdoor play space. Install fall-absorbing surfaces like rubber mulch. Select age-appropriate play equipment. Ensure enough open space for running and games. Regularly inspect and maintain equipment for safety.
Conclusion
Crafting your own outdoor play area is a rewarding project. It fosters creativity, encourages physical activity, and guarantees hours of fun. Start building your dream play space today and watch as it becomes the heart of countless cherished family memories.
Embrace the joy of DIY and play on!